Eli Amon is a professional photographer, based in Markham, Ontario, who has developed a successful business spanning a range of specialties. From corporate and commercial assignments, to special events, weddings, and school photography, Eli’s portfolio encompasses subjects at all stages of life… we asked him to reveal the secrets for success, using the basic lighting kit that would be appropriate for the new professional, or the photo enthusiast interested in expanding his or her skills as a portrait photographer.
The key to a successful photograph lies not in the technique of the photographer, but the art of posing – anyone can set up lights, backdrop, and camera to create a properly exposed and pleasantly lit photograph – but it takes a pro to coax that perfect smile from the subject, who is often nervous in the midst of a full studio lighting set.
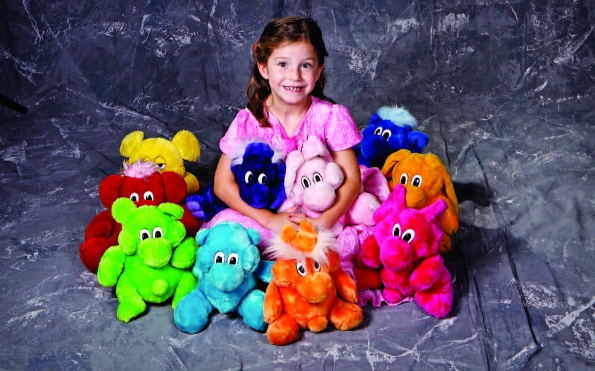
I have spent many years working with children, shooting school portraits and family photos ranging from carefully structured formal portraits to casual images, carefully posed and lit to bring out the best in the subjects.
Working with children is a specialty that not all photographers can master – while a busy executive may only give you a few minutes to capture the perfect portrait, a child will only work with you as long as you can hold their attention – once the child decides that this game isn’t fun anymore, you have lost the magical window of opportunity, and the smiles and expressions lose the genuine qualities that are so important in a portrait.
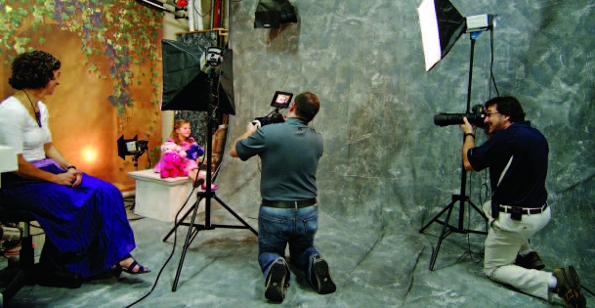
To photograph a child, you have to create an environment in the studio that will let the child feel at ease. All of your lights and equipment should be ready before the child and parents arrive – check your settings and the angle of light the best you can, anticipating the age and size of your subject. Nothing wastes that precious few minutes of shooting time more than a studio that is not prepared in advance for your guests – that’s right – guests – you have to make the child feel like a guest in your very special play area. I always suggest that the parents bring along some props – the child’s favourite toys, or a family pet – something that the child will relate to, whether it is in the frame, or just out of view. The expression of a child interacting with a pet can be priceless.
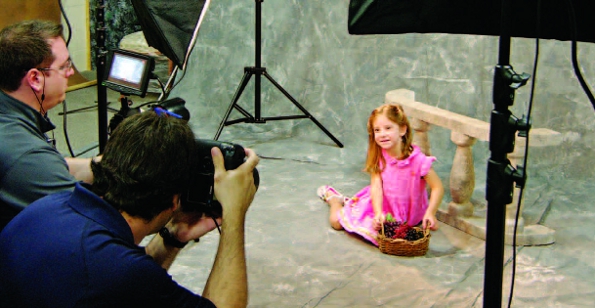
For this article, I used the basic three-light studio set-up, with soft box and reflectors. We selected a backdrop that complimented the subject’s complexion, and produced a modern “look”.
You will notice from the lighting diagrams that I place the main light – generally the soft box, quite close to the subject – the secret is to work with the quality of light, not the quantity of light – the closer the soft box is to the subject, the softer the lighting effect becomes – many photographers place the soft box too far from the subject, resulting in light that is more harsh than necessary.
Using the lighting diagrams as a guide, and experimenting with your results to produce your own preferred style, is a wonderful way to begin producing professional quality portraits. Start here, and let your skills develop as you explore the many types of light sources and modifiers that are available to the studio photographer.
Lighting Diagrams:
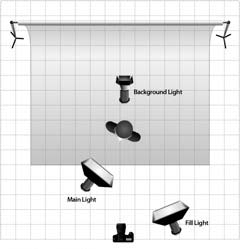
 For the first portrait set-up, I used the soft box placed to the left of the subject, at an angle of approximately 40 – 45°, and set the strobe to f/8. I placed the background light behind the subject, and set it to f/8 as well. The fill light was placed directly in front of the subject, at a distance of approximately 2.5 metres (8 feet) and the strobe was set for f/5.6. The camera was set for ISO 100, and I shot at f/8, 1/125 second. This produces a 2:1 lighting ratio, which is a standard for portraiture.
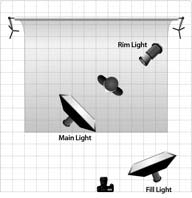
 For the second set-up, I changed the angle of the background light, aiming it at the back of the subject’s head to act as a hair light. The setting, once again, was f/8. The main light was the soft box, placed close to the subject, but out of the frame. The fill light for this set-up can be adjusted according to the subject – for children, I like to use a 2:1 lighting ratio – for adults, I vary the fill lighting ratio to adapt to the characteristics of the person’s face. For heavyset subjects, I move the soft box to light the short side of the face. For lean subjects, the lighting can be a bit more pronounced. I start shooting at ISO 100, f/8, 1/125 second, and vary the exposure and/or the light output as required.
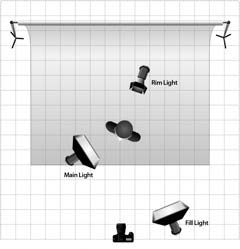
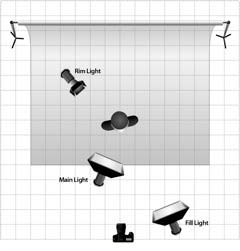
 For the third set-up, I moved the hair light to the right side of the set, to function as a kick light, and used barn doors to keep the light off the backdrop. The main light was the soft box. The fill light for this shot was set to f/4, to produce a 3:1 lighting ratio. Camera setting was ISO 100, f/8 at 1/125 second.
 The fourth set-up used a technique that I like to refer to as “cross-lighting”. I set up two units, one to the subject’s left, and the other to the subject’s right, and used a grid to diffuse the light. The third light was a hair light. This produces a very dramatic but evenly lit portrait, that stands out very well from the background.
Equipment:
I used a three-light Visatec Logos Kit #308, consisting of: three LOGOS 800 strobes including flash tubes, modelling lamps, protecting glasses and grey transport protection caps, mains cables; 1 standard reflector; 1 set of barn doors; 1 silver umbrella; 1 umbrella reflector; 1 Soloflex 60; 1 set of honeycomb grids; and 1 synchronous cable, 5 m. The kit comes with a handy travel bag, compact enough for the trunk of your car. While light stands were not included in the kit as described on the Visatec website, I ordered a version of the kit that came with Manfrotto stands.
Some photographers just setting up their first studio may wonder why I chose the Visatec kit, rather than the less expensive alternatives. The choice is really simple – for a professional, the quality and dependability of equipment is critical, and for a realistic investment, you have a set of lights that will deliver long-term durability, backed by excellent product support. With the Visatec units, manufactured by Bron in Swtzerland, you can be confident that the product will be the highest quality – that gives you consistency of light output and colour at the full range of settings. The Visatec line is distributed in Canada, and meets all of the Canadian electrical standards. Spare parts and accessories are readily available, and you can expand your lighting gear as your skills develop and as you take on more complex assignments. The photos shown here were shot with a Canon EOS 1D Mk 4, and a Tamron 70-200mm f/2.8 lens. This focal length is ideal for portraiture, as it allows you to stand out of the light, and far enough from the subject to avoid crowding their “comfort zone”. Shooting at a low ISO maintains very high quality, and using f/8 assures that the subject will be in focus, from the tip of her nose to the curls at the back of her head.
From a professional perspective, setting up a studio shot on location often becomes a spectator event – when you arrive with professional gear, your clients will be confident that they have chosen the right photographer for the job – show up with equipment that does not perform, or gear that is not up to professional standards, and your clients may not be as certain that they made the right call… it is, in effect, a matter of professional image.
Article by Eli Amon
| PHOTONews on Facebook | PHOTONews on Twitter |


