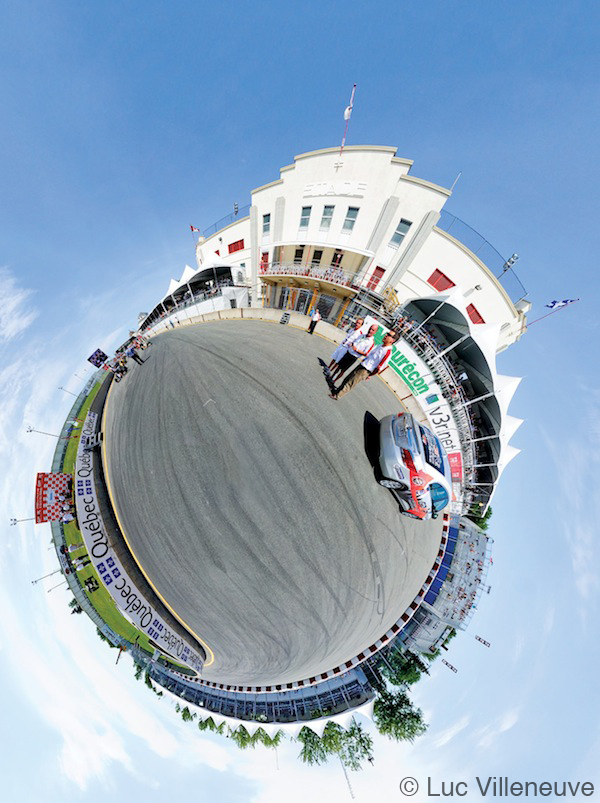
For this issue, I decided to challenge myself a little bit more and shoot scenes with fast moving objects – so I went to the Grand Prix de Trois-Rivières.
I contacted the organization to get my press accreditation. That was the easy part! On-site, I realized that all the reserved areas for photographers were simply one square foot holes in the fences. That’s all you need for almost any lens, but for a fisheye, it is way too small.
There are also flagman holes that are a bit bigger, but even then, to capture 360° images these holes are almost useless. Nevertheless, I decided to use one of the large flagman holes at turn #1 to capture a scene.
I scouted the site to find the right spots to capture my other panoramas. While searching for these spots, I always look up. I started my wish list with the roof of the control tower, which is accessible to the TV crew and race officials. There is also an elevated stage, which could definitely be good location, but it is another restricted area. People working in the pressroom are used to special requests from the photographers. never hesitate to ask for their help. They granted me access to both spots. That’s two additional locations.
During my discussion with the media services manager, he came up with an unexpected offer: “If I give you access to the track just before the national anthems – with all the racing cars on the start line, can you do it in 2 minutes?” I replied “Yes! At what time?” “Be here at noon, I will escort you to the guy in charge of the protocol.” That is a great position for a spherical image.
To close the loop of this virtual tour I captured 360° images inside the pits. All I had to do was ask. With all these images, soundtracks and stills, I left the site to create this virtual tour.
Creating the tour
A virtual tour is a reproduction of a location and it is normally composed of more than one spherical image. A virtual tour can also contain still images, sound tracks of all kinds and even videos. To end up with such virtual tour, you must step out of your photographer’s shoes and be willing to play with different media – and maybe… write some code.
In the last issue, I used Autopano Pro to create 180° x 360° images. For the VR tour I used Panotour Pro, also from Kolor, to build the virtual tour. Autopano Pro and Panotour Pro can be downloaded from www.kolor.com.
When you buy a licence for Autopano Pro, you also get a licence for krpano, which is the viewer. All features in krpano are also available, with a graphical user interface, with Autopano Pro. This will avoid the need to type xml code.
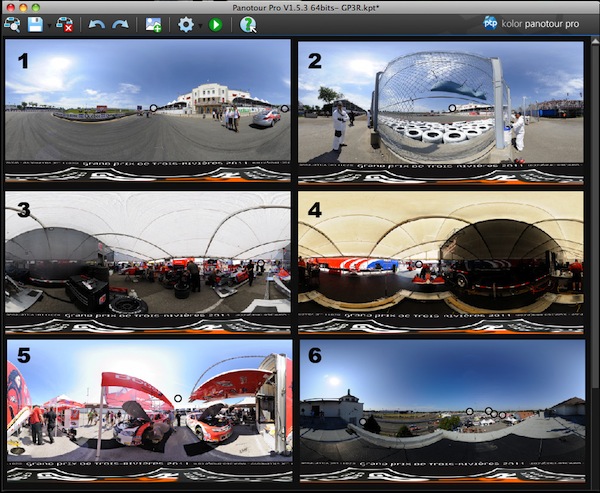
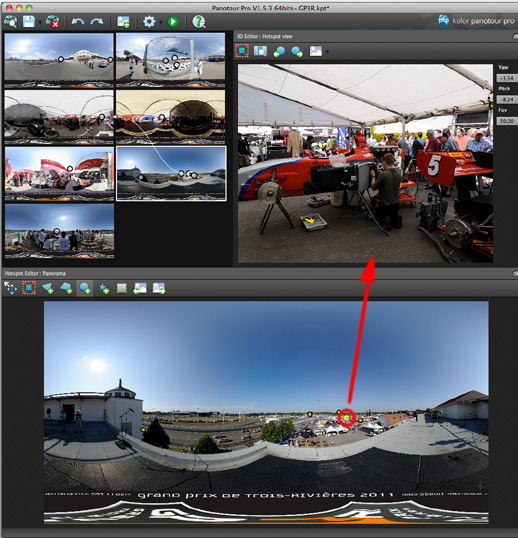
Before you begin, you should have your final 180° x 360° images, colour corrected and sharpened. You should also have your soundtrack and other media handy. Open Panotour Pro and add your panoramas by clicking on the icon that has a plus sign. Import all the images to be included in your virtual tour. You should get something like this:
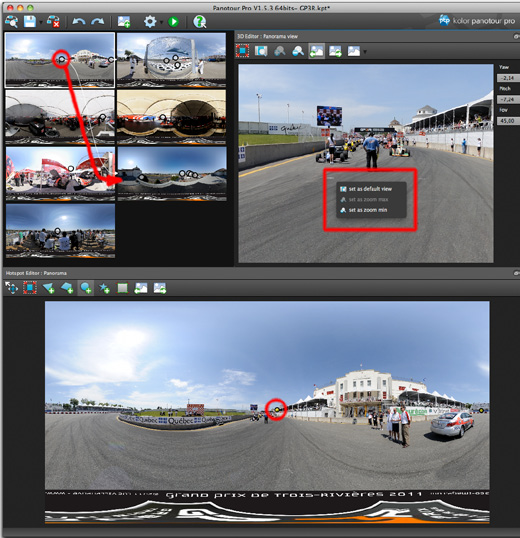
The next picture shows the creation of a point hotspot on panorama #1. This hotspot has been created in the “Hotspot Editor” window. Then, in the main window, I dragged the hotspot to panorama #6. This tells Panotour pro to create a link between the hotspot and panorama #6. When the user clicks on this first hotspot, panorama #6 will be loaded. note that when you select a panorama in the main window, you can play with the 3D Editor to change the Yaw, Pitch and FOV (Field of View). When you like the scene, right-click on the 3D Editor to define the “Default view” for this panorama.
Then you move on and add all the hotspots you need to navigate back and forth in the virtual tour. For each hotspot, you can define the default view for the next panorama.
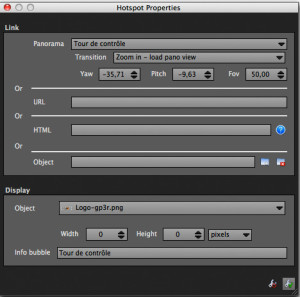 When all of your hotspots have been created, it is time to configure them. The picture to the left shows the properties you can set individually, for each hotspot. It is in this dialog box that you define whether the click will open another panorama, or a web site, or a graphic element. In this dialog box you can set how the hotspot will appear in the virtual tour.
There are two other types of properties in Panotour Pro. Because each panorama can have its own soundtrack I decided to add the Indy car soundtrack on every panorama where there are Indy cars. I did the same thing for the nascar beast!
 Finally, the picture to the right shows properties that will be applied to the entire virtual tour. In these properties, you can set the type of control bar you want. You can define if the panoramas will rotate automatically, as well as the speed of the rotation. Be sure not to rotate too fast – or the visitors to your virtual tour may get motion sickness! If you want to build your own theme with personalized buttons and templates, you might have to create XML files.
You can set a splash screen at the beginning the virtual tour. You can also enable thumbnails of each panorama so the users can jump from one panorama to the other without following the hotspots. Many other customizations can be done. With Panotour Pro, you will discover a very powerful tool.
The last step is to build the tour! This is quick and simple. Click on the icon that looks like a gear. You tour should be ready to review in a few seconds.
I cannot tell you what type of equipment we are going to use ten years from now, but I can tell you that there will always be better hardware and better software to help photographers bring the real world to the virtual world.
My ”two cents“ on the market for virtual tours…
The most common use of virtual tours is to show real estate. I recently met with an agent to get an update on their point of view on virtual tours. The agent was already using the service of a photographer for still and 360° images.
Here is a transcript of a part of this exchange. I didn’t capture this conversation on a recorder like any good journalist would have done, but nevertheless… I can tell you that this conversation is engraved in the non-volatile part of my brain!
LV – How much do you pay to get pictures and 360° images of a house on your web site?
Agent – $89.
LV – For one picture?
Agent – no, for the twelve pictures and two 360° images!
My market update was done! In my ears, her answer sounds like “Don’t touch this market”.
My conclusion remains the same. The virtual tours created for the real estate business will not make any photographer rich. There are a few good reasons for that. The first one being that the lifespan of a real estate virtual tour is very short. If the property sells quickly, the virtual tour may never be published! As soon as the house, condo or apartment has been sold, the virtual tour becomes useless and often ends up in the trashcan.
If you are thinking about growing a virtual tour business, find industries or markets where your images will last longer, and look for amazing locations or events to promote.
My ”two cents“ on the VR tour user experience…
When you want to build a virtual tour, you must find out the type of interface that will offer the best experience to the users.
I have seen virtual tours of a few car dealerships where you have to click 14 times before entering the showroom. Fourteen! With a good interface, 14 images are more then enough to complete the whole virtual tour. This virtual tour of the car dealership was composed of hundreds of images, most of them being useless. There was nothing in the interface to bring the user straight to the service department, I had to find my way by myself. It felt more like a “Where’s Waldo” experience than a corporate visit.
The VR tour interface is more than important, it is crucial. Think quality rather than quantity. Create an interface that makes sense for the users.
My principal ingredients are menus, maps, buttons, thumbnails and/or hotspots. The type of interface depends on the subjects, the number of images, or space available on the web page.
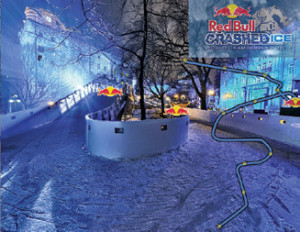 For a virtual tour of the RedBull Crashed Ice, I used a transparent map so the user can figure out where he/she is located without the map being too obtrusive over the image. The RedBull logo will show where you are on the track. It’s the “you are here” of the virtual tour. I also added hot spots to move “on” the track. The user has two choices – click on a hotspot or on the map.
For the Quebec Open Jeep, I used menus on the left because there were only 4 images, all from the same course.
Panorama Q&A
Following my article on panorama photography, I received a few questions from readers. The first one was: “Besides spherical images, what else can be done with stitched images?” The other question was: “Can we get a print version of these images?”
You already know that with a 180° x 360° image, you can create a spherical image. That’s what I do for almost 80% of my productions. These spherical images cannot be printed – but you can use a different projection, and there are almost 20 different projections that can be printed.
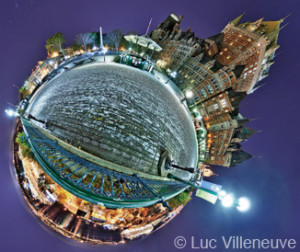
Some of these projections can be spectacular. When I was young, one of my favourite books was The Little Prince of Saint-Exupéry. On the cover, there was a very small planet. One of my favourite projections is the stereographic projection also known as Little Planet. Here are 2 examples of this projection.
The first one is a project I did for my holiday seasons greeting card for 2010.

The second one is also a little planet. This spectacular image from the launch of the space shuttle STS 133 was done by Jook Leung. Not only is this spectacular, the coefficient of difficulty is very high. Getting the press accreditation was an experience. Jook had to install his gear the day before the launch of Discovery. On that day, he made a full spherical panorama. Then he pointed the camera at the launch pad, secured the tripod with sand bags, and installed a “sound trigger” to start the capture of a quick sequence of images. The final image is worth all the effort.
The second question was “Can we print these images?” Yes you can. The last three pictures can be printed. As a last example, here is a crop of a full equirectangular image of the wine cellar of Jackson Triggs from the Niagara Valley.
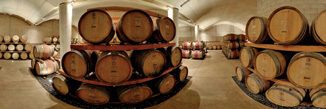
With these new options, you can now show places from a totally new perspective.
Article by Luc Villenueve
| PHOTONews on Facebook | PHOTONews on Twitter |


