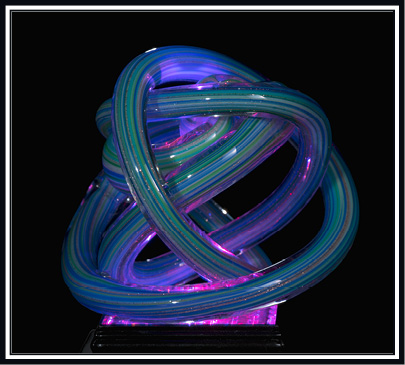
Low Key with fog, putting it all together optically
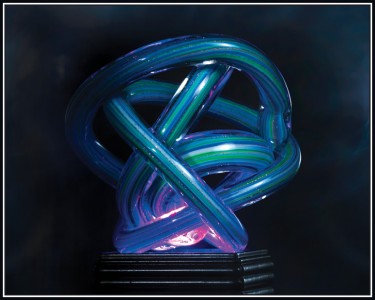
My wife gave me this beautifully detailed and eye-catching glass sculpture for Christmas called an “Endless Knot”. It was time for a challenge and I wanted to capture the entire image optically – no Photoshop effects were used here. I did some levels and curves tweaks to get exactly what I wanted from the final image. The fog is real and exposures are as shot, which made blending that much easier.
I used my Micro-Nikkor 105 on my D810 – due to the small size of the Knot, the macro lens was an easy choice. But do I shoot it high key or low key? Coloured paper background? Strobe or flash? What modifiers will I use?
Lighting anything made from glass is always a challenge. And my Endless Knot also has bright blues and greens and some highly reflective gold flecks.
Low key was my next decision – to illustrate the colours and textures and not make it look like a magical ribbon that just floated in white space.
Due to the small size of the subject, I chose flashes for lighting, in this case two Cactus RF60 wireless flashes. The Cactus system allows me to adjust the power of each flash directly from camera – I don’t have to move to each flash to adjust it individually. A second V6 on camera is both trigger and power control.
Beginning with three pieces of Black Plasticore – two angled out in a V shape sitting on top of another piece – surrounded the Knot in black.
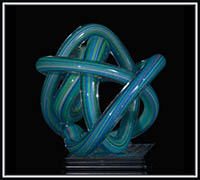
First Shot
To keep the background a deep, rich black, I wanted a low ISO (the Nikon D810’s lowest native ISO is 64 – I could have used the Lo-1 boost of ISO32, but wanted to maintain the great dynamic range).
Measuring the distance from camera to subject gave me an aperture of f16 to get the required Depth of Field to ensure sharpness from front to back on my subject, which is only 3.5 inches in diameter.
To ensure a nice, rich black background, I stopped down my lens by another 1/2 stop to f20.
The diagram to the right shows the initial setup. I’ve got my D810 and Micro-Nikkor 105 mounted to my Vanguard ABEO Pro CF tripod and GH-300T grip head. The GH-300T is a ballhead with an easy-to-use grip and a built-in shutter release so I don’t have to touch the camera, which might cause shake. This combination of head and carbon fibre tripod is very stable.
LumiQuest has a diverse collection of flash modifiers and they’ve recently introduced their UltraStrap. The UltraStrap is now used to hold modifiers on your flash instead of gluing Velcro to flash head.
For my main light, I decided on a fairly large modifier, the SoftBox LTp. The LTp really spreads the light and creates beautiful, soft shadow transitions – light falloff is very subtle. I positioned my main light camera right to reduce reflections and glare.
I had a few choices for fill, but really wanted to direct the fill into the back of the Knot to add depth and dimension. The best tool for that is a snoot and LumiQuest’s Snoot XTR is a unique and very useful modifier. It starts off as a 10° snoot, but with the exclusive Snoot ExTendeR, light can be narrowed to less than 5°!
After “eyeballing” where I wanted my lights, it was time to meter for the right exposure. As I had turned all the studio lights off, ambient light wasn’t going to be an issue – it was dark in there. Flash power and duration was going to expose this shot – not the camera shutter.
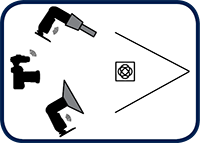
Setup Diagram
With my Gossen DigiSky meter set to ISO64 and 1/60 second, I took meter readings from the Knot and from the background. I was looking for enough light to expose for f16 on the Knot. I found that 1/83 power from my mainlight with the SoftBox LTp was perfect.
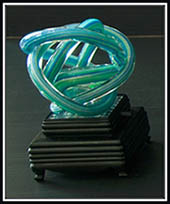
The Base
I also wanted as close to 0EV as I could get from the background. Using my meter, I could adjust the position of the background until I got as little light as possible on it. I also adjusted the angle of the LTp so less light would fall on the background.
Aiming and metering the Snoot XTR was a little trickier as where wanted to put the light wasn’t feasible to get a meter into. I had to remove the Knot and place the meter in the spot I wanted to light.
I started at the same power setting, but due to the lack of diffusion, I was getting too much light from the Snoot. Since my Gossen meter told me I was getting f36, or one full Stop more light. Using the Cactus V6, I simply pressed B and spun the dial to drop the power of the RF60 Fill light to 1/163.
With my main and fill metered, it was time for a test shot.
Overall, not bad. Nice black background, but I wasn’t thrilled with the angle of the Knot or the highlights. And it seemed a little “blah”. It need some life, some mystery.
I tried a different camera angle and spun the Knot around. Not yet.
Then I remembered the base I was using had LED lights. Batteries are great thing to keep in our camera bag! I was now mixing ambient (even though it’s still artificial) LED light with strobe.
I metered the LED light source, this time setting my meter for f11. I wanted the LED lights to be an accent only – LED alone was just a mash of colour that made the Knot unrecognizable. And metering for one full Stop less light would help ensure the LEDs didn’t take over, as my meter showed a 10 second exposure time now!
Another step to make sure the LED lights didn’t overpower the exposure was to set my camera to rear curtain sync – this fires the flash just before the shutter closes, instead of when the shutter opens. If I fired the flashes at the beginning of the exposure, the LED lights would have dominated instead of accented as they would have provided more light to the exposure.
Now I was getting somewhere. The Endless Knot was starting to look really cool, so I tried a few more angles. I didn’t like seeing the LED light source – I felt it took away from the Knot – so I lowered my camera to put it almost level with the top of the Base.
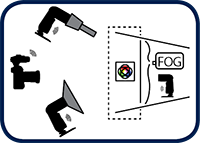
Setup Diagram #2
What makes things look really cool? FOG! And I had some low level fogger solution leftover from Hallowe’en! This fog is meant to stay low.
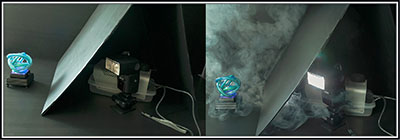
V-shaped background concealing the fog machine and Metz 64 AF-1
/ Cactus V6 combo.
Placing the fogger in front of the Know would have blinded my camera – I needed the fog to come from behind. So I changed my setup.
I kept the Knot in the same place and set my fogger behind it. Then I bent a piece of Black Plasticore in half, with a small A clamp to hold it, and opened up the V background so the sides acted like flags to control any reflections. They also helped focus the fog.
I also knew that the LEDs would affect the look of the fog, and I wanted a natural colour to the fog. I decided to backlight the fog, this time with a Metz 64 AF-1 mounted on a Cactus V6 Wireless Flash Transceiver. I placed my Gossen meter where I hoped the fog would be, using the same settings as I did to meter my main and fill lights (ISO64, 1/60s), and adjusted my Metz down to 1/326, which gave me an f8 on the position of the fog.
I added a piece of foamcore to the top of my setup – doubling as a flag and for holding the fog in place. Now, it was simply a matter of finding the angle I wanted and getting the right amount of smoke! Here’s what the final setup looked like from the side:
Low Key photography can be challenging enough, as the deep black background can be the hardest to achieve. Adding LED lights (ambient light) and moving fog (almost a floating reflector) upped the challenge. This is where a light meter saved a lot of clicks on my shutter.
The light meter helped me set each flash to the power I needed, simply by popping each flash and reading how much or how little light was being output at a given setting. The light meter fills in the missing point from the Exposure Triangle – if I know aperture and ISO, it will tell me exposure time; if I know exposure and aperture, the meter will show me the ideal ISO.
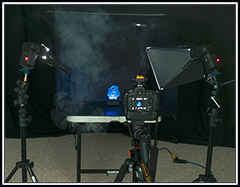
View from behind the camera
A lot of photographers will change a flash setting, then take a test shot. For this setup, with 3 flashes plus an LED light source, that could have been 100s of shutter clicks and a lot of time reviewing on the camera screen or computer. By using a meter to get the lights close to the settings I needed, I only needed a handful of test shots. I’d rather spend more time shooting the fun part – trying to get the fog just right – then clicking and reviewing to check my lights.
You can easily try this at home. It’s key to get your flash off camera so it’s not throwing light onto your black background. Wireless transceivers and/or wireless flashes, like the Cactus V6 and RF60, make it easier to walk around (in the photo above, the only cords are power for the fog machine and the fog activation controller) – you’re not going to wipe out your setup by tripping over a cord. Robust flash modifiers, like those from LumiQuest, are solid and keep their shape, ensuring my light always looks the same from them.
There are lots of things around your home that you can photograph Low Key. Foamcore and Plasticore are available from your local office supply or hardware store and are usually very inexpensive. You can experiment with single flash and a reflector or get together with friends and pool equipment. Cactus V6 is cross-brand capable with full power control, or go fully manual and cross-brand with Cactus V5.
Gear Used to get this shot:
- Nikon D810 with MB-D12 Grip
- Nikon AF-S VR Micro-Nikkor 105mm f/2.8G IF-ED Lens
- Vanguard ABEO Pro 283CGH Carbon Fibre Tripod
- Vanguard GH-300T Grip Head
- Gossen Digisky Light Meter
- Two Cactus RF60 Wireless Flashes
- Two Cactus V6 Wireless Flash Transceivers
- Metz 64 AF-1
- Two Metz lightstands
- One LumiQuest SoftBox LTp
- One LumiQuest Snoot XTR
- Two LumiQuest UltraStraps
- Five sheets Black Plasticore/Foamcore
- Multi-colour LED Display Stand

About the Author
Will Prentice (www.capturaphoto.ca) is a professional photographer based out of Whitby, Ontario, and Brand Specialist – Lighting for Amplis.


