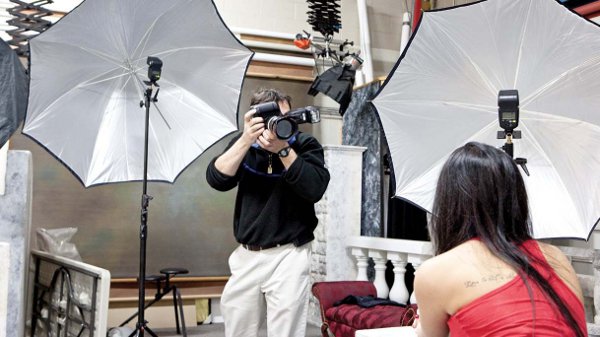
Readers who are familiar with the equipment of the film era may have tried off-camera flash with light triggered slave units, but the technology has become much more sophisticated in the digital era, with most of the mid-range and professional cameras and flashes providing wireless capabilities that let you take the flash off-camera without adding any optional accessories – the Metz flashes that I used for this article even come with their own little stand, that has a threaded socket that you can use to mount the flash on a light stand (or a tripod). The main reason I chose the Metz flash system over the camera manufacturer’s dedicated flashes is the significantly lower price of the Metz. Metz flashes have been used and trusted since 1938 so I did not compromise on quality.
Over the years, I have used off-camera shoe mount flashes for assignments where portability is the key concern, and if your requirements are realistic, you can achieve excellent results with equipment that you may already own!
The first step to better portraits is to take the flash off-camera. In the old days, you had to have a dedicated sync cord – today, wireless TTL flash features in the camera and compatible flash units make the process very simple.
For most mid range DSLR cameras, the off camera flash can be controlled by the camera – usually, the pop-up flash emits a stream of data to communicate with one or more remote units. In my case, my Canon EOS 1D Mark IV, doesn’t have a pop-up flash feature, so I used a Metz 58 AF-2 on the camera’s hot shoe, set to function as a controller – the “master” flash was turned off for this unit, so that it would communicate data to the remote flashes, but it would not contribute light to the scene. Of course, the 58AF-2 can be used as a master flash, a controller, or a remote – you can extend the range and f/ stop capability of the multiple flash system by using several 58 AF-2 units, but to keep the set-up simple, I used the new Metz 50 AF-1 units as the remote (slave) flashes for this assignment. They are rugged and fast recycling units with a metal hot shoe. Built to last, these flashes have a zoom head that covers the 12mm to 105mm focal length. I really like the metal flash foot – you need this if you are a serious photographer – the plastic feet wear down, causing problems with electrical contacts, and they tend to break at the worst possible moment… not likely to happen with a pro-quality foot.
I used the little plastic stands supplied with the flash units to attach each remote flash to a Manfrotto light stand, and I mounted umbrellas to each stand to soften and spread the light.
As we explore the technique of wireless off-camera flash, please note that most mid range DSLR cameras have a built-in flash with wireless commander mode features – the terminology and functions vary from brand to brand – some refer to this as “controller” mode. Within each camera brand, some models offer basic wireless flash controls, others have more sophisticated features. It is best to study your camera manual to determine which wireless flash functions you have at your disposal, and what type of flash you need to complete the system.
The Metz 58 AF-2 and 50 AF-1 flash units that I used to illustrate this article are compatible with Canon, Nikon, and other major DSLR systems – each flash is dedicated to a specific system, but they offer a USB connection that will allow you to upgrade the flash program features as the technology evolves – this should dramatically extend the useful life of the flash, compared to other brands, that will become obsolete when technology is “tweaked”.
As an “old school” photographer, I like to use manual flash adjustments, but for this assignment I used the camera’s E-TTLII flash metering system. To my surprise, the TTL flash system was super accurate, and I got amazing results with no effort whatsoever. The various cameras have their own terms for this type of flash exposure automation – for example, Nikon refers to it as I-TTL, Pentax calls it P-TTL, and so on – check your camera manual for specific instructions on the wireless flash modes and the menu settings available to use the on-camera flash in wireless master or controller mode. Some systems allow you to choose a different channel for the flash data transmission – this comes in very handy if you are shooting in an area where other photographers are working. The flash manual describes the settings available in the flash itself – I use the “group” settings to be able to control the output of each flash independently. Investing in a good flash is a wise decision – carrying a ray of sunshine in your camera bag can save the day in many difficult lighting situations – for example, I often use Auto mode for fill flash outdoors, and the flash unit balances its output with the ambient light for excellent exposures. For quick shots in small rooms, the Metz 58 AF-2 has a secondary flash tube that you can activate to fire forward when the flash head is angled up to bounce light off a ceiling – you can set the amount of output for the second flash tube, to get just the right “twinkle” in your subject’s eyes – a very useful feature that does not exist in any other brand of flash.
The Metz 50AF-1 units are ideally suited for remote flash operation. Once you set the flash to function as a remote, it does not go into “sleep mode” – this is critical when you are taking a few minutes between shots to adjust the lighting position, or when the model takes a break to adjust hair or wardrobe. These flashes are very easy to work with, and the manual clearly explains how to set them for remote or slave operation.
But let’s get back to the assignment at hand – to replicate studio-style portraits using regular shoe-mount flash units.
I prefer to modify the light for my portraits as larger light sources placed closer to the subject create softer, more pleasing light. In this case I used umbrellas but you can also use softboxes with your shoe mount flashes so you have more control over the spread of the light compared to an umbrella. However that’s another article you’ll need to stay tuned for. As a side note, if you are travelling with your flashes and wish to modify the light you can use Lumiquest flash accessories – the new Softbox LTp (10×14”), pocket bouncer, big bounce, and softbox flash modifiers are inexpensive and very convenient to use.
To demonstrate the use of off-camera multiple flash, I used various setups with one, two, and three remote flashes, all controlled wirelessly by the flash mounted on the camera. I assigned a “group” for each flash, so that I could quickly adjust the power settings for each flash in that group from the commander flash on my camera.
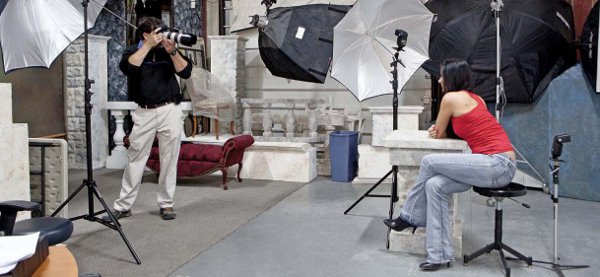
I generally shoot with my camera meter set for center-weighted average readings, as opposed to a full-frame average metering pattern. This came in very handy for the shots where I lit the backdrop to have it come out white. I deliberately adjusted the backdrop flash to a wide-angle setting and higher output than the other remotes, and the light on the background did not cause the subject to be underexposed.
We shot for more than an hour, changing poses and wardrobe as you would normally do for a model photography assignment. Using the Metz 58AF-2 and the 50AF-1 units, I shot at 400 ISO to have a good range of apertures to choose from at the working distances appropriate for portraiture. I shot with two lenses, a 24-105mm zoom set for 105mm, and a 70-200mm zoom set at 135mm. I used f/5.6 to capture detail from the tip of the model’s nose to the back of her head.
I was very happy with the consistency of results with the Metz flashes in general, and especially pleased with the results from the two and three flash set-ups. The latest Metz models have sensors that can receive data from a greater range and a wider angle than the earlier models, and this really adds to their versatility in multiple flash set-ups.
While there are some limitations to using multiple shoe-mount electronic flash for a professional assignment, most enthusiasts can work wonders with this versatile equipment. The major advantage of the larger studio strobes comes into play when you need extra output – for large groups, when the subject is farther from the light source, or when you want to shoot at small apertures. By and large, for portraits in a 10’ x 10’ home studio, the small flash units can produce great results.
Sample Setups
In this lesson I used the camera set to manual with auto white balance. if you wish for better colour consistency use a custom white balance (see your camera manual to learn how to set it on your camera). Although I used the flashes on TTL metering, the camera must be set manually for the light ratio to work properly. Have fun!
Sample Photo 1 – Only one Flash

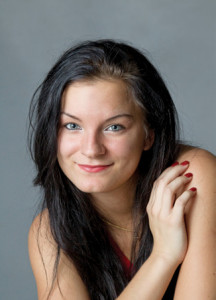
Camera: Canon 1D Mark IV
Lens: Canon 24-105mm F4 L IS
ISO: 400
Shutter Speed: 1/125 second
Aperture: F/5.6
Off camera Metz 50 AF 1 set to TTL mounted on a stand bounced with an umbrella controlled by the Metz 58 AF 2 on camera set to remote (Master flash set to Off).
Ideal for close-up and to create a dramatic lighting
Sample Photo 2 – Only one Flash and a reflector

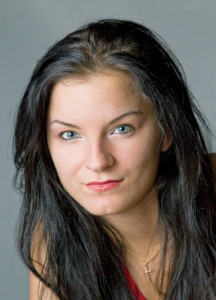
Camera: Canon 1D Mark IV
Lens: Canon 24-105 F4 L IS
ISO: 400
Shutter Speed: 1/125 second
Aperture: F/5.6
Off camera Metz 50 AF 1 set to TTL mounted on a stand bounced with an umbrella, controlled by the Metz 58 AF 2 on camera set to remote (Master flash set to Off). A silver reflector is positioned on the other side of the subject, helping to reduce shadows and acting as a fill light.
Ideal for any close-up portrait
Sample Photo 3 – Two Flashes

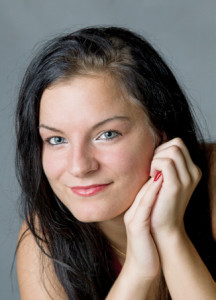
Camera: Canon 1D Mark IV
Lens: Canon 70-200 F2.8 L IS
ISO: 400
Shutter Speed: 1/125 second
Aperture: F/5.6
Two off-camera Metz 50 AF 1 flashes. Key light set to TTL group 1, mounted on a stand and bounced with an umbrella 45º to the subject. Fill light set to TTL -1 F stop to achieve 2 to 1 ratio, flash set to group 2, mounted on a stand and bounced with am umbrella positioned alongside the photographer. Both flashes controlled by the Metz 58 AF 2 on camera and set to remote (Master flash set to off).
Ideal for all portraits including 3/4 length and Full length
Sample Photo 4 – Three Flashes / Lighting the Backdrop

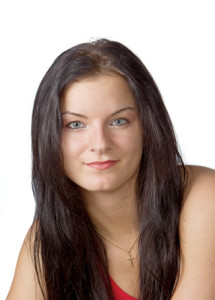
Camera: Canon 1D Mark IV
Lens: Canon 70-200 F2.8 L IS
ISO: 400
Shutter Speed: 11/125 Second
Aperture: F/5.6
Three off-camera Metz 50 AF 1 flashes. Key light set to TTL group 1, mounted on a stand and bounced with an umbrella 45º to the subject. Fill light set to TTL -1 F stop to achieve 2 to 1 ratio, set to group 2, mounted on a stand and bounced with an umbrella positioned alongside the photographer. Back light set to TTL +1 stop on group 3. In order to get a pure white backdrop, the flash is set to over expose by one full F stop. All flashes controlled by the Metz 58 AF 2 on camera and set to remote (Master flash set to off).
Ideal for all portraits including 3/4 length and Full length
Sample Photo 5 – Three Flashes / Rim Light Effect

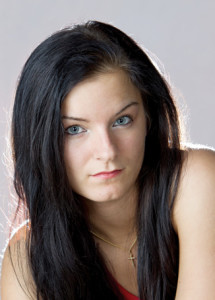
Camera: Canon 1D Mark IV
Lens: Canon 70-200 F2.8 L IS
ISO: 400
Shutter Speed: 1/125 second
Aperture: F/5.6
Three off-camera Metz 50 AF 1 flashes. Key light set to TTL group 1, mounted on a stand and bounced with an umbrella 45º to the subject. Fill light set to TTL -1 F stop to achieve 2 to 1 ratio. Flash set to group 2, mounted on a stand, and bounced with an umbrella positioned alongside the photographer. Back light set to TTL -1/3 F stop on group 3. A third flash added to the light the subject from behind creates a rim light effect. This flash is simply rotated toward the back of the subject. The third flash can also be easily used as a hair light if mounted on a high stand and directed towards the subject’s head from behind. All flashes are controlled by the Metz 58 AF 2 on camera set to remote (Master flash set to off).
Ideal for all portraits including 3/4 length and Full length
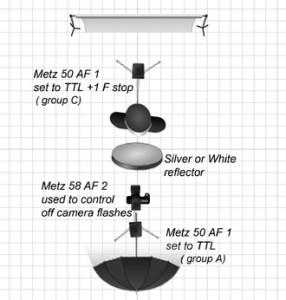
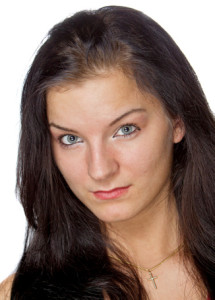
Sample Photo 6 – Two Flashes and a Reflector / Beauty Light
Camera: Canon 1D Mark IV
Lens: Canon 24-105 F4 L IS
ISO: 400
Shutter Speed: 1/125 second
Aperture: F/5.6
Off camera Metz 50 AF 1 set to TTL, mounted on a stand and bounced with an umbrella positioned above the subject and pointing 45º downwards with a reflector under the chin of the subject. Second flash set toward the backgroun at TTL +1 F stop.
This type of lighting is used for glamour and models photos, producing a nice soft lighting with a large catch light in the subject’s eyes
 After experimenting with the lighting set up, you are ready to shoot like a pro! The threelight technique was used here. Two Metz 50AF 1 flashes in umbrellas, and a third flash to light the backdrop (see sample photo 4). This photo was retouched just a bit using Photoshop, to remove blemishes and some flying hair. This can be easily achieved with any editing software.
P.S.: Experiment with the light positions to achieve the desired look. Remember that the closer you place your key light to the subject, the softer and better quality light you will get. I used umbrellas to demonstrate this lesson but depending on your budget you can use any light modifier available. Umbrellas are the least expensive solution for the portable studio.
| PHOTONews on Facebook | PHOTONews on Twitter |


