The big day has arrived and it is a dream come true – you are leaving for a photo safari in Africa! The anticipation of the trip has consumed your thoughts for months. You have revised your list of photo gear over and over, planning for every need and every eventuality. You expect to carry two DSLR bodies, four lenses, batteries, a charger, lens cleaning kit, a flash, a tripod, a laptop and an external hard-drive to backup your images. Only one thought haunts your enjoyment of getting ready for the trip… how are you going to carry all that stuff?
No problem – it’s in the bag!
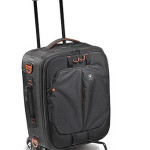
Obviously, all of this gear will not fit into your usual camera bag. For a trip of this type, you need a rolling camera bag or a very well designed backpack. It is worth the effort to find the best bag to carry your gear at the airport, on the plane and at your destination.
So… which bag? Personally, I like bags with wheels. But what size bag? I go for the largest carry-on bag that the airline allows – and I always double-check the airline rules, as well as the aircraft configuration. Not all airlines have the same rules, even for the same type of aircraft. Do not even think about packing a bag bigger than the maximum carry-on size – travelling to foreign destinations, or even cross-country, it is not unusual to see a large camera bag disappear into the land of checked luggage, never to be seen again!
Most airlines will allow you to bring a second carry-on item into the cabin. This second item is often intended to accommodate a purse, a laptop bag, or similar item that is smaller then the carry-on luggage. You can exercise your option to have two carry-on items to cover your photo gear.
Always check the weight of your luggage. The surcharge for heavy luggage is viewed by the airlines as a profit centre. If you travel with a friend, the other person might be willing to carry some of your gear so that you can avoid weight surcharges, but remember that the first question that will be asked is “did you pack your own luggage?” followed by “did anyone give you something to take on the aircraft?”
Some airlines charge for the first item of checked-baggage, so many travelers try to carry everything on board, which can make it difficult to find space in the overhead compartments. Make sure your bags have luggage tags, and keep an eye on the storage compartment.
For some photo expeditions, I use hard cases because they are the most robust way to carry fragile equipment. I also use them because they are watertight and somewhat airtight. If I shoot outside at -30° Celsius, before going back to the warmth, I put all my gear in the hard case and close it. I then let this equipment warm up slowly. This will avoid condensation inside and on the surfaces of lenses and camera bodies. It really does not matter if your gear is weather sealed or not, moving from -30°C to +20°C is a 50°C shock. Photographic equipment does not like that. During the winter, I carry a few large plastic bags from Loksak (www.loksak.com) in every one of my camera bags. These resealable bags are certified waterproof to 60 metres (200 feet). Mine are large enough to accommodate a pro DSLR body with a 70-200 lens. After an outdoor photo shoot, I place my gear in a few of these bags, remove the air with a straw, and wait until the gear warms up to the ambient temperature.
Without a doubt, there will come a day when one of your flights will be late and you will have to move through the airport at light speed to catch your next flight. In a situation like this, a photo bag with wheels is a major advantage. If you have to do some trekking, a backpack might be a better choice. When avid photographers design luggage, the result can be inspirational – that is why Kata offers a backpack with an optional trolley! For the photo traveller, that bag is the best of both worlds.
Pick the perfect seat…
On a long trip, a seat with a bit of extra legroom can make the difference between a week-long backache, and a wonderful experience. TripAdvisor has a great website to help you plan your trip – check out www.seatguru.com. You will find general information for all of the major airlines, including the luggage allowance for each traveller. Finally, but certainly not the least important information on the site, there is a detailed and interactive seating plan for every aircraft in the fleet. You may be surprised to learn that Air Canada has three versions of the Boeing 767-300, with different seating arrangements… use the website to see exactly where your seat will be.
This last option will let you chose the best available place in the aircraft. Move your cursor over a row and you will get details like restrictions on space for your legs or proximity of a lavatory. Be sure to select a seat with floor storage space for takeoff and landing. A seat near an aisle always has more storage than a window seat because of the curve of the fusilage. This is even more appar- ent on regional jet aircraft. Emergency exit rows offer more room for your legs but the seats do not always have floor storage.
Check-in time
First of all, you should always be courteous with the staff at the airport. You might need their help. You will always get more help if you say please and thank you than if you have your fingers clenched on the counter.
If you do not have a reserved seat, arrive early. Never drop your carry-on item at the counter – if you look like someone who just finished a marathon, and your bag looks heavy, they will ask you to put your cabin luggage on the scale, and hand you a bill! Most companies will allow 10 kilos per item of cabin luggage. Altogether, two carry on items can weigh up to 20 kilos, which should be
enough for most photographers. Remember, carry-on luggage has to look light.
Just between you and me… I always wear a photographer’s vest. If I know that my luggage might be overweight, I will transfer a few lenses and batteries to this vest. Fortunately, airline companies still do not have restrictions on the weight of your clothing, but the security guards will view the vest and its contents as a possible risk, so you can expect to be searched. Do not wear the vest while walking through the metal detector!
May We Check Your Bags?
No thank you! No matter if it’s a cell phone, a point-and-shoot camera or professional photo gear, the number of thefts from checked baggage is still way too scary to take the risk. I cannot imagine arriving at my destination without my gear. I never let my equipment out of my sight. N-E-V-E-R!
While preparing this article, I spoke to a lady who works for a Canadian airline. She told me that they have an average of ten claims per week for lost or stolen items. This lady also told me that the claims would be close to zero if all the travellers had placed their valuable items in a carry-on bag. Please, do not tempt the baggage thieves, they all wear x-ray glasses!
Actually, I have not met a professional photographer who let his precious gear go alone as a checked bag when he could carry it in the cabin. Your essential equipment should always be with you. If you have to travel with lighting equipment or long lenses like a 400mm, a hard case shipped by an overnight service like FedEx or UPS is probably your best bet.
Boarding Time!
Board the aircraft as soon as you can. If you are late you may discover that all the overhead bins are full. When you board a regional jet, there will be an additional baggage examination from an agent. Because these aircraft have restricted room and overhead bins do not accommodate a normal carry-on bag, you may have to leave your carry-on at the sky-check. An employee will then transfer
your carry-on to the luggage compartment.
That is where your carry-on luggage can be converted to checked baggage. If you are prepared for this, you can still keep your bag with you – be confident and mention to the agent that you carry valuable photographic equipment. Tell the agent that you purposely selected an aisle seat with available space for your carry-on. Normally, you should have a safe-conduct to the cabin. Be sure to look like a professional who has been doing this for years. Grey hair should help! They never refuse my request to keep my gear in the cabin.
Pack an Extra Bag
 At your destination, you may find your travelling bag to be larger than you need for daily use. I often pack one or two extra camera bags in my checked luggage, either empty, or packed with some of my clothing to make the best use of space.
Normally, I use a bag big enough to carry my equipment for the day. I like sling bags. You can carry your gear easily on your back or safely in front of you. In some countries, you might carry equipment that is worth the annual salary of a whole family.
Be careful wherever you travel. The threat of theft does not only come from people living in poor countries. Have you been to Rome? After your very first steps in this marvelous city, some people will flag you as a source of income! If you carry a tripod, do not leave it outside your bag, it will act like a neon sign that says to thieves “I carry photographic equipment”.
Modern hotels have a safety deposit box in every room. Use it to store the gear you do not need on any given day.
Finally, you should always have a Y38 form from the Canadian Border Services Agency. On this form, you should have the description and serial number for every piece of equipment you are carrying with you.
Do not let your travel dream of a lifetime turn into a nightmare. Be prepared, have a safe trip, and bring back great pictures!


