About the Author:
John is an award winning Photoshop Instructor and Professional Photographer living and working in the Greater Toronto Area and is on the faculty at Humber College.
Yes, I know, I could have made my own instead of spending my hard earned money on this device. And yes, it would have been quite easy to have made my own but I decided to buy this unit and then write an article on it , and post it for the whole world to read.
Over the past few years I have received emails and even phone calls from both current and former students expressing concerns about certain lenses and one in particular, the Canon 28-70 mm f2.8 L-Series, which don’t focus very sharply. Well, being a Nikon user, I had never heard of this before but some Canon users were quite familiar with this phenomenon. Some had even mentioned to me that they have that lens and it works great with one Canon camera body but not so well with their other camera body.
After further investigation, I have come to learn that this is not just a Canon thing and have learned how to Fine-Tune my Nikon equipment. What follows next is a step by step procedure to fine tune your lenses to your camera bodies.
Now before I go any further, not all camera bodies have this capability. Apparently this is only available on the more expensive camera bodies. You’ll have to check yourself to see if your camera body has this feature.Now, some of my students have just returned the lens in exchange for another one and everything turned out fine and another student found the AF Fine Tune feature and played around with it until he got a sharp image. Well after claiming ignorance to this situation – only because I had never experienced this before on my own equipment – I decided to learn what this is all about.
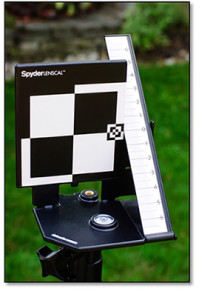
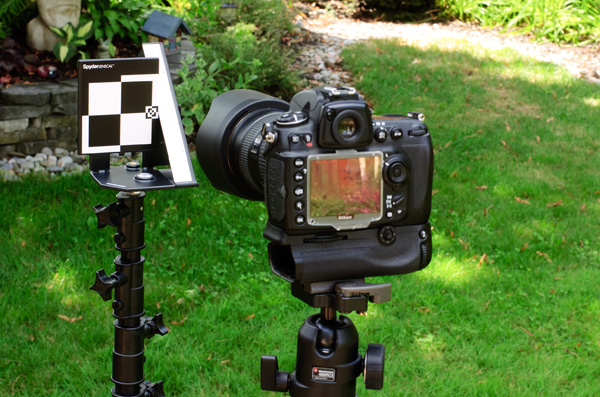
Moving forward … As you can see, I have my Spyder LensCal mounted and balanced on a light stand. This unit comes with a socket that allows for mounting but has the thread size of a typical tripod socket which is great if you are going to mount this on your tripod but if you do that, what are you going to mount your camera to? Usually light stands have this reversing thing that fits on the very top of the stand – use that to mount this calibration tool and put your camera on the tripod.
Once your camera is on the tripod and your exposure and white balance are all set up, you’ll want to get your camera in nice and close but not the minimum focusing distance of your lens but almost. So this is what I did; set the focus to manual and then set the focus ring to minimum and moved the camera and tripod in until the chart was in sharp focus and then moved back a bit.
Set your camera to Aperture mode and set your aperture to it’s widest setting – in my case that was f2.8. Since we are testing for the auto-focus on this camera lens combination, we want the lens to auto-focus from totally out-of-focus so rotate the focus ring all the way to infinity and beyond … Now turn focus option lever back to “S” for single auto focus on Nikon and press the shutter button halfway to allow the camera to focus and then all the way to take the picture.
Note: This is your current Default AF Fine Tune or Micro Adjustment Focus Setting. Mark this down in your note book – First image = Default.
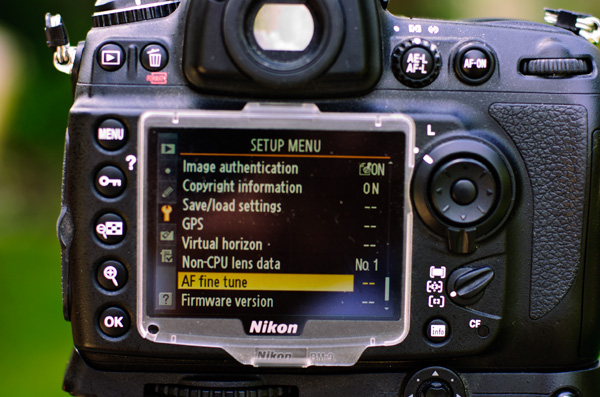
Now go into your Setup Menu and in my case the wrench option and choose AF fine tune and using the Selector Button move right.
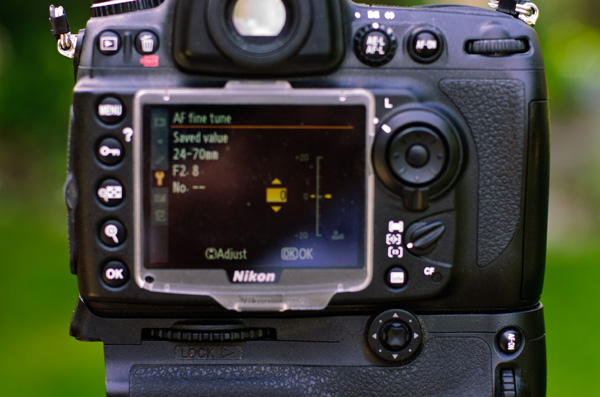
Once in here turn on the AF fine tune feature and you will notice a scale and a marker set to “Zero”. Use the Selector button to advance from 0 to 1. Then click Set. Your camera is now set to capture the next image withe the AF fine tune setting of Plus 1.
Before you take the picture, set your focus back to Manual, set the focus ring to Infinity and then set the focus back to “S” for single auto focus. Depress the shutter button halfway to invoke the auto focus and then all the way to take the picture. Pretty simple eh?
Repeat this up to Plus 20 and then Minus 20. In all, you should have 41 images. Keep your records straight so you know what you are looking at once you are back at the computer.You might want to set your file type to JPEG for faster post production – Just remember to put it back to Raw once you are finished. If your eyes are good enough, you might be able to get away with using Live View on the back of your camera.If your lens and camera combination need adjustments, put that lens back on your camera (if you have taken it off) and go back into the AF fine tune Menu option and set your camera to whatever fine tuning setting had the sharpest focus. Save it and every time you put that lens back on your camera, it will remember what Plus or Minus setting you assigned it.
 In 2005, John was the first ever recipient of the Dean Collins Photoshop Educator Scholarship Award presented by Scott Kelby, President of the National Association of Photoshop Professionals (NAPP).
Web sites: www.thephotoshopchannel.com & www.firstframephotography.ca
All Photos by John Warren


