At first glance, it seems that DSLR video is as easy as “point and shoot” but when the director calls “action” it takes more than a good eye and a steady hand to capture the scene at its best. It would take a thick book to cover all of the possibilities and techniques that can be used with the new DSLR video cameras – but with a bit of thought, and a few accessories, you can start to create some very impressive projects.
DSLR video technology is progressing very quickly – let’s take a look at the advantages and disadvantage of shooting video with your DSLR camera.
One of the greatest advantages of using a digital SLR camera to produce video is image quality. The sensors on digital cameras are bigger than the ones used on any of the consumer video cameras, which theoretically should produce a sharper image. Add to this the opportunity to use a very wide range of lenses, and you have a very versatile DSLR video camera system. When you consider the depth of field effects that can be achieved with the better DSLR lenses, the result can be nothing short of breathtaking.
Of course, nothing in life is perfect, and at this point in the development of DSLR video technology, there are a few challenges that make good DSLR video more difficult than just shooting home movies with a digital camcorder. Because of the high frame rate required for video capture, the DSLR stabilization systems, designed for still photography, are not effective. Autofocus systems don’t work during video sequences, and zooming tends to be less velvety smooth than it would be with a video camera. The standard microphones built into DSLR cameras don’t produce optimal results. But don’t be discouraged! There are many accessories that can substantially enhance the capabilities and quality of your DSLR video productions. These devices, developed for the professional video industry, are so ingenious that they can certainly be considered to be “video magic” – and they are often within the price range of the enthusiast videographer!

Before we explore the gadgets and gizmos that video magicians use to create their productions, let’s step back to make sure that we have all of the basic settings for successful DSLR video.
The first step on the road to great video is to have a reference point for your technique. Start by using the manual mode, set your shutter speed to 1/60 of a second, and adjust the aperture to make sure you have a good exposure. Start with low ISO, and then move the ISO higher if necessary.
Many people think that they can handhold the camera and create good video. In most cases, this will not be practical. It isn’t easy to hold a heavy camera and lens steady for more than a few minutes, and you cannot pan or zoom as smoothly as you think – you really should invest in a good tripod with a video head for stability and smooth movements. A Manfrotto with a good fluid head is the preferred choice for most people.
Making a good video with a DSLR is like making a Hollywood movie, you have to take lots of angles, shoot footage for inserts and close-ups, and resist the impulse to zoom in and zoom out – most of the time viewers find this to be very distracting. Build your story with different camera angles and pans. use the depth of field at wide aperture settings to your advantage – it is easy to isolate a person or an object from the background using this technique, and the results look great in high definition!
When you use your new tripod and video fluid head, there are some special techniques that can help you capture better videos – here are a few tips to get you started…
The photo camera will not follow focus in video mode, so planning your points of focus before you start recording is critical. Manual focus mode is the simplest and often the best way to go, but some cameras will let you autofocus before recording – just remember that even with the autofocus system “on” as soon as the recording is started, the autofocus won’t work.
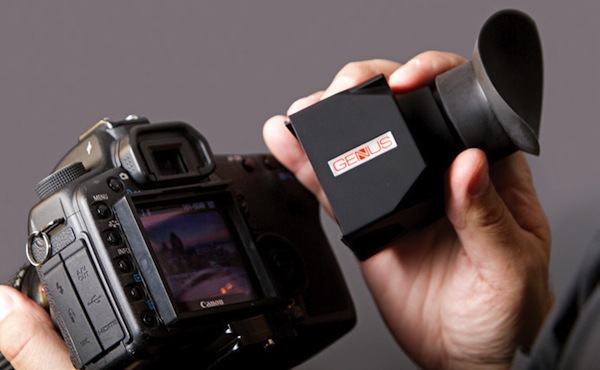
To help you get better focus, there are many accessories that you can add to your bag. From my perspective, the loupe is one of the cheapest and easiest ways to get better focus. The loupe is great for focusing because it shades the LCD screen and shows you sharp details – it is like adding a viewfinder to the camera. It is also a light and easy way to help you stabilize the camera when you hold it solid against your face – I don’t leave home without it!

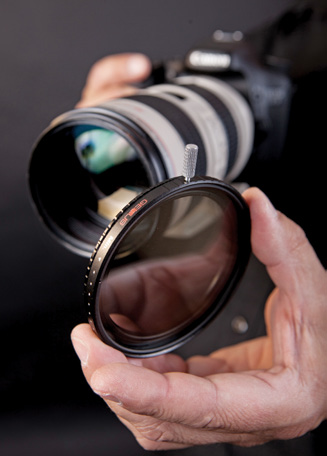
 Using the camera in daylight creates another challenge – it may be impossible to use your camera lens wide open to achieve the shallow depth of field that we all strive for. Even at ISO 100, to make good exposure, the setting could require f/11 or so. To be able to open up the aperture to f/2.8 you will have to use a neutral density fader. An ND fader is made of two circular polarizing filters – when you turn them to increase the polarization effect they progressively block the light that enters the lens. With this accessory you will be able to use the aperture of your choice while keeping the shutter speed at 1/60 of a second for all your video shots.
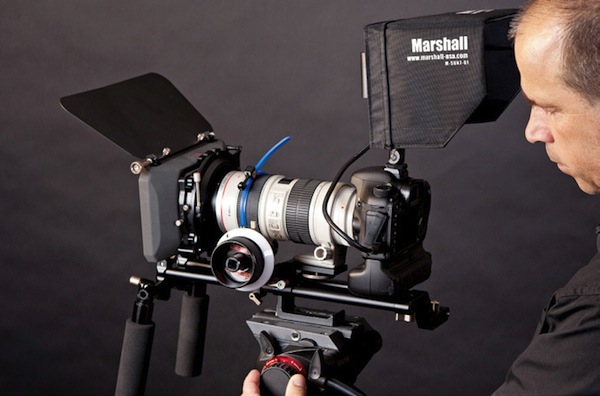
Another great tool for focusing is to connect an external monitor to your camera. Adding a Marshall monitor to your kit will change the way you see your video.
You may also want to use a sunshade when shooting outdoors.
For easy manual focusing, pros use a device called Follow Focus that is attached to a base under the camera. The device will help you focus with precision, and the focus movement will be smooth. On high-end professional work, pros often employ a helper – the “focus puller” to control the device while the videographer frames the shot and takes the video. The “focus puller” uses a set of markers on the device to indicate where the focus should begin and stop.

One of the most underrated aspects of a video is the sound. Good sound will separate the amateur from the professional on any video project.
The bad news is that your camera sound recording is far away from being professional. First, you can’t connect headphones to listen to what you are recording. So you will need to look at the sound level graphic in your camera display to capture relatively decent sound. Some cameras let you switch from automatic to manual level sound recording through the video options menu.
So you can’t listen to your DSLR sound recording when using the built-in microphones – but you can add an external microphone or a wireless microphone to your camera. This is a big leap to better sound than the tinny microphone on the camera.
If your goal is to make a great sound track for your movie, you will have to use pro microphones and record the sound on a separate device like a Zoom H4n, then sync it back in postproduction. Yes, it is quite a bit more work, but shooting DSLR video “Hollywood style” is the only way to assure great sound.
To add all these gadgets to your camera you will need a Rig built to handle the accessories. It is amazing to see all the choices that are available for the aspiring cinematographer. All of them have advantages and disadvantages, so Google the subject and read about the various types of products.
Once you have captured the best images of your life, you may think that you can just sit back and enjoy the applause – sure, that’s cool, but we are not done yet… When the director says “it’s a wrap” the real work begins – transferring the videos to the computer. It’s as easy as transferring your regular photos, but for the best results you have to edit your video, choose the best images, process all the in and out points, sync the sound, add graphics and overlays, add music, colour correct, and lots more.
When you are ready, it is time to invest a bit more effort to build a DVD or export your masterpiece to your Blog, YouTube, or Vimeo…
To become the next Spielberg is not an easy goal, and it is not for everyone, but believe me, once you acquire the basic skills, DSLR video is lots of fun! Happy shooting!
Article by Michel Roy
| PHOTONews on Facebook | PHOTONews on Twitter |


