As recently as mid-2008, few of us could have imagined shooting video with a digital SLR camera. While that feature was becoming common in digicams with built-in lenses, it simply did not exist in a DSLR until August, when the D90 was released. Since then, most new DSLRs have been equipped with a “Movie mode” with varying levels of versatility and resolution. All can provide HD quality clips however, and some can actually meet broadcast standards.
For example, the feature film Reverie was shot with a D90, while the season finale of the TV series House (aired on 17/05/10) was made entirely with an EOS 5D Mk II. Granted, DSLRs have some limitations and drawbacks versus a dedicated HD camcorder in terms of functionality and convenience of operation, but there are benefits as well. If you are just starting to shoot videos, or if you have been frustrated during earlier attempts, read on. With a basic appreciation of the technology, and by using appropriate techniques, it’s certainly possible to achieve great satisfaction.
 From Live View to Movie Mode
Video capture was slow to work its way up to DSLRs for one primary reason: the reflex mirror often blocked the light path, preventing a full-time electronic display. Only after that challenge (and some smaller technical issues) were overcome, was it possible for such cameras to provide a live view display of the subject on the LCD screen. Additional modifications also made it relatively easy for the engineers to add a movie mode.
However, live view posed one serious problem. When a DSLR uses conventional phase-detection autofocus, the live “feed” to the LCD screen is interrupted for a moment due to the necessary reflex mirror flip-flopping. That’s annoying when shooting stills in live view and it would have been unacceptable during video capture. That’s why some cameras disengage autofocus when Movie mode is selected.
Other DSLRs do provide AF, using contrast- detection technology, employing the imaging sensor instead of the autofocus sensor. This eliminates the need for reflex mirror action – and interruption of the video – during AF operation. This type of AF is certainly convenient but it is significantly slower than phase-detection. When the system hunts for focus during video recording the results are very distracting. Hence, some manufacturers recommend manual focus even with DSLRs that provide AF in Movie mode.
 Movie Mode Features
Aside from the autofocus issue, let’s take a brief look at the useful options available in Movie mode. Most cameras allow for important features to be set before recording such as Picture Styles, exposure compensation and overrides for sharpness, contrast and saturation. With most (but not all) cameras, the aperture can also be pre-set before video recording; a few provide aperture control while you’re shooting a clip. Either feature allows for depth of field control.
Because a DSLR employs a huge sensor compared to a camcorder (such as 22.3 x 14.9mm versus 3.6 x 4.5mm) you can achieve much shallower depth of field. The limited range of acceptably sharp focus allows for isolating a subject against a blurred background. This effect is particularly dramatic when using a very wide aperture (such as f/2.8) especially in close focusing or with a telephoto lens. Just as important, the oversized pixels can capture more photons (light particles) in less time for better quality, particularly in low light.
If the camera or lens is equipped with an image stabilizer or vibration control system, shake compensation can be provided during video capture. Of course this device cannot work miracles when the camera is held in one hand. As well, the sound produced by the stabilizer motor – and by the autofocus motor with some DSLRs – is recorded on the audio track by the built-in mic. That can be minimized by using an optional external mic, but only a few DSLRs accept this type of accessory.
Useful Video Techniques
While DSLRs vary in their Movie mode features, the key to making better video is straightforward: maximize the positive aspects and minimize the drawbacks. After testing many of the consumer-grade DSLRs, I can offer the following tips for getting better results with less frustration.
Use the Right Memory Card: Because Motion JPEG files consume a great deal of space, load 8GB media and carry spares if you plan to shoot long clips. Also use a fast (Class 6 or 233x, or faster) card that can keep up with the large stream of data.
Set High Resolution: All DSLRs with Movie mode can generate low resolution videos in small files for use on a Web page, such as VGA (640×480 pixels). These may also be acceptable for viewing on a small computer monitor. But you’ll probably want to display your clips on a widescreen TV so select the higher 720p HD (1280×720) mode. Some cameras can also record at an even more impressive Full HD 1080p (1920×1080) and you may wish to try that as well. Of course, the 1080p video files will be much larger; they’ll consume more space on a memory card and editing will be frustrating unless you use a very fast computer.
Pre-set the Overrides: Even if the camera allows for functions to be changed while recording a video, pre-set these to avoid sudden changes during the actual video. Shoot a test clip to decide whether you need to set exposure compensation (for a brighter or darker video). Also decide as to the most suitable picture style mode such as Standard, Portrait or the Vivid or Landscape style for more dramatic results. You may also wish to modify the level of Contrast, Sharpness and Saturation that any picture style will employ.
Focus Manually: Since AF in Movie mode – if it’s available – will be slow and somewhat noisy, manual focus is more suitable. (When the camera-to-subject distance will not change, you can simply pre-focus, of course.) Granted, manual focusing and zooming can be awkward when holding a DSLR away from your body in order to view the LCD display. Single-handed support also increases the risk of camera shake. For greater convenience and for more professional-looking videos, mount the camera on a tripod.
Keep it Slow: Move the camera slowly and smoothly. Avoid very fast panning since this can produce blurring and a distortion called “jello effect”. Zoom slowly and infrequently, to avoid an effect that most viewers will consider distracting or annoying.
Use a Video Head: Compared to a conventional tripod head, a video head can provide smoother pan/tilt effects to prevent jerkiness in your movies. This type resembles a pan head but most adjustment controls can be achieved with a single handle which can be loosened, tightened and locked. The better models – including the Manfrotto 701HDV mini head, or the compact Gitzo G2180 – are equipped with internal fluid cartridges. The more affordable photo/video heads. like the Manfrotto 391RC2, employ Teflon pads (or a silicon lubricant) for smooth pans and tilts.
Set a Wide Aperture: In dark locations, set f/2.8 or f/4 if your camera provides aperture control in Movie mode. Or use P mode which should set a wide aperture automatically. This will minimize the need for the camera to set a high ISO so digital noise (graininess) will be less problematic. Setting a wide aperture also maximizes the effective distance range of a video lighting kit.
Add Some Light: For “cleaner” more professional videos in dark locations, consider an LED light for nearby subjects. Check out the LitePanels MicroPro Lite kit, for example. This accessory produces slightly warm (5600K), illumination without the heat, flicker, harsh effects or inconsistent colour produced by many conventional “hot” lights. It’s compact, lightweight, includes a built-in dimmer switch and is powered by 6 AA batteries or an optional AC adapter. A MicroPro Lite can be mounted on the camera or used remotely if you add an optional base plate or an articulated extension arm.
Edit Your Videos: In order to maximize the viewing experience for friends and family, plan to do at least some basic editing of the video files. Cut any particularly distracting moments or problems caused by some technical difficulty. More advanced video editing is also possible (for colour and brightness adjustment, adding music etc.) but that’s not essential if your clips are acceptable in most aspects.
Maximize Display Quality: Plan to show only your best videos on a widescreen TV. If you have not yet started editing, try to start and stop a clip so as to avoid displaying any problem sections: camera shake, hunting for focus, a very quick, distracting zoom, etc. Buy an HDMI cable with a Mini HDMI (Type C) plug on one end to connect the camera to the TV. (Large consumer electronics stores that sell cameras should stock this accessory.) You simply cannot get the same quality when using the old-style AV cables with RCA plugs.
Share Your Videos: Several free video sharing sites are available on the Internet, including the very popular YouTube and Vimeo. Be sure to check each as to the file formats, resolution and file size that can be uploaded; these aspects vary from site to site. Many video enthusiasts prefer Vimeo (free) especially with the Vimeo Plus option ($60 US per year). The latter provides even cleaner HD quality and allows for uploading a full 5GB of 720p clips per week.
Accessories for Serious Video Shooters
In addition to families who appreciate a DSLR’s movie mode, an increasing number of serious shooters are using cameras of this type for video recording. That includes semi-professionals shooting weddings and other events as well as pros who have switched from a video camera to a DSLR because of the advantages discussed earlier. If you fall into either category you will soon discover a need for accessories to make the process more convenient or to help you become more technically proficient.
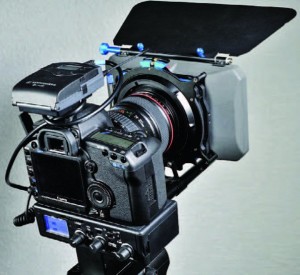
I had the opportunity to be one of the first writers in Canada to check out a new line of GENUS brand accessories, specifically designed for those who shoot video with a DSLR. They range from compact, affordable items to high-grade equipment that would meet the needs of a professional production.
Let’s take a brief look at what’s available and the problem-solving benefits of each of these exciting new products.
Genus Loupe
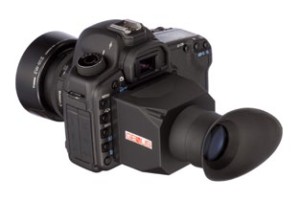
Prism LCD Viewfinder: Because few DSLRs are equipped with an articulated LCD, GENUS developed this product (GIVSTA) to make it possible to view the screen when the camera is held at a high or low level. Attach either the horizontal or vertical viewfinder accessory to any 3-inch LCD using the Velcro attachment frame and you can shoot while holding the camera at just about any position. The hooded design also makes it an effective LCD screen sunshade when you remove the front flap.
Genus Loupe: This new accessory is designed for glare-free LCD viewing while shooting and in playback mode. It’s compact and lightweight, but it can prevent a lot of frustration on sunny days.
Sunshade: Designed to provide flare control in extreme side lighting, this device (GSS) clips onto an internally-focusing lens using an adapter ring. It’s equipped with a lockable filter holder that will rotate 360°, an important feature when using a polarizer or a graduated filter such as an ND Grad. The kit includes a “wide rayshade” that will minimize the risk of vignetting with wide-angle lenses.
Genus GWMC Matte Box and GMB DSLR Adaptor Bars System
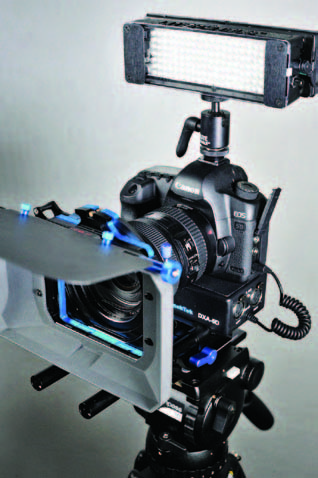
DSLR Matte Box Kit: Similar in concept but more rugged and offering more features, the GENUS matte box (GMK/DSLR) is preferable for serious videography. The device includes two removable aluminum trays for 4×4” (or circular) filters including one that can be rotated as desired. It’s also equipped with an aluminum “French Flag” at the top for preventing light spill from striking the front lens element and degrading contrast. You can attach the matte box directly to a standard or wide-angle internallyfocusing lens (with an optional screw-in adapter ring) since it’s not excessively heavy.
Pros typically use a tripod, so the matte box can be attached to support rods (or rails) instead; they’re included in the kit and allow for mounting the assembly on a tripod head. These special rails were designed to provide the raised platform that’s necessary with most DSLRs. By eliminating stress on the front of the lens, this setup provides greater security, and it also accepts add-on accessories. When a tripod is impractical, the rails can be attached to the optional GENUS Shoulder Mount System (G-SCMK) instead. The latter provides great stability and is ideal in situations where the camera must be hand-held.
Follow Focus System: Because DSLRs are typically used with manual focus in Movie mode, pros using a support rail often add this (G-SFOX) device with a geared mechanism. That allows for very smooth manual focusing; there is no need to touch the lens itself. A large knob becomes the focus controller making it relatively easy to followfocus a moving subject.
Some of the pro-grade GENUS accessories represent an investment in terms of video gear, but they offer excellent value because they help you produce a professional result. For a full appreciation of the construction, features and benefits of these devices, be sure to visit a retailer for a hands-on demo.
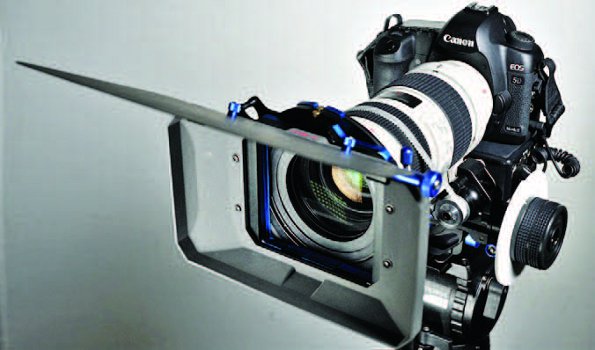
Genus Follow Focus on Matte Box
The Bottom Line
A DSLR with a Movie mode is not as convenient as a dedicated HD camcorder with its fast autofocus as well as greater versatility and convenience of operation. But the ability to record video clips is a real bonus with a camera system that’s already very desirable because of its vast range of photographic features.
An increasing number of photo enthusiasts have come to appreciate the absolutely gorgeous movies that the latest DSLRs can generate with high-grade lenses and suitable accessories. After a study of the owner’s manual and some experimentation, it’s possible to master the basics in a few days. Use serious shooting techniques, begin to explore editing software and get inspiration and advice from others on a Web site such as Vimeo. All of that will pay off and you’ll soon be making crowd-pleasing movies that you’ll be proud to show and share.
Article by Peter K. Burian
| PHOTONews on Facebook | PHOTONews on Twitter |


