At this time of the year we all focus on the vibrant colours of the season … so let’s explore the techniques of adding and enhancing colours in Photoshop! It is a simple and creative process – we will begin by exploring the hue/saturation adjustment layer and layer masks to change colours in a photo or specific parts of a photo, then we will use the colour layer mode to add some special “magic” to the image.
For today’s adventure in Photoshop technique, we will work a little magic with a portrait – the same technique can add impact to any type of photo, and it can be used for special effects or basic colour correction.
One colour adjustment that is essential for commercial photography focuses on the impact of the eyes in a portrait. When you take a very close look at modern magazines, you will see that almost all of the portraits have the eye colour changed or corrected, and we are not just looking at photographs of people – the eyes of animals are often Photoshopped as well!
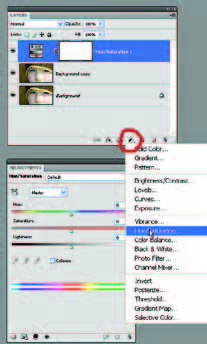
Let’s start with a photograph of my son Mathieu, that I took last year, and apply a touch of magic. The first step is to add a dash of colour correction. To keep the original image intact, duplicate the layer before making any alterations (Ctrl/Cmd J). Now you can safely create a hue/saturation adjustment layer. Click the icon on the bottom of the layer palette.
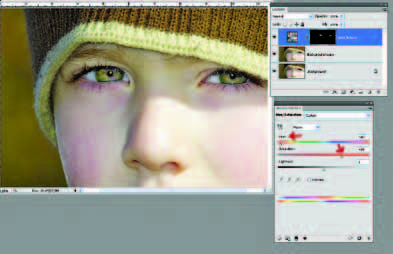 Now make sure you see the hue/saturation panel – if not, go to top menu – Windows – Adjustment to display the panel. If you play with the sliders you will see the colour change throughout the image. When we create an adjustment layer in Photoshop, a mask is automatically built by Photoshop and attached to the displayed image. For this experiment we just want to change the colour of the eyes, and we only want to do this on the on the mask layer. We begin by using a soft brush tool to paint the iris black – the colour effect is now everywhere but on the iris.
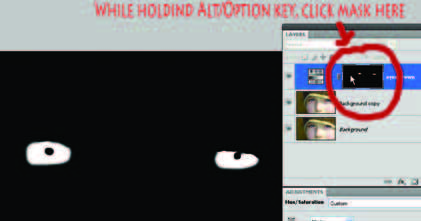 Now invert the mask (Ctrl/Cmd I) and only the iris will be affected by your adjustment. Play with the sliders to see the range of adjustments that are available – you can go for slightly enhanced effects, or you can use your imagination and really make it cool. If you want to erase some parts of the mask, just paint them black with your brush tool. Always make sure that you select the mask icon and not the image itself. A white border appears on the mask icon when it is selected. You can verify your selection by clicking on the mask icon while holding the Alt/Option key – repeat this action to return to normal view.
Once you have become familiar with these simple steps, the real magic can begin. Start by moving the sliders left and right until you have the effect and colour that you desire. Because the effect that you create is on a masking layer, the next step is to use the opacity slider to adjust the intensity of the effect to perfection. When you create all of your special effects using different Photoshop layers you can enhance or “dial down” each effect to suit the image, without risking any damage to your work.
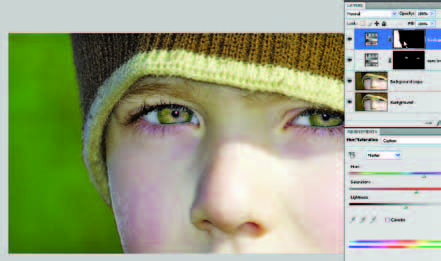 Now that you have taken the first step, repeat the process to create a new adjustment layer, but this time, mask the background.
Of course, there are several more complex techniques to adjust colours in Photoshop but our project is designed to show you an easy and effective way to play with an image – so have fun!
Some Photoshop fans use the “colorize” button from the hue/saturation panel to add colour to a photo. This will work but it has it’s limitations, and it will remove all of the colours already present in a photograph and replace them with a tint – this technique can be quite interesting, and it would be a logical next step in your Photoshop adventure.
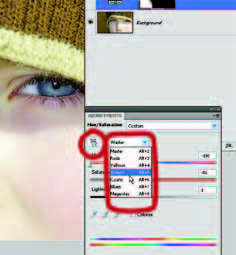 You can also use the “color picker” for more precise work. After choosing any colour from the drop-down menu, click on the “color picker” button then click on your image to choose the colour you want to adjust, then make the change with the saturation sliders. There are also adjustment knobs at the bottom of the adjustment panel – you can slide them to making even more precise selections. Add a mask to make precise adjustments without losing any of your previous work.
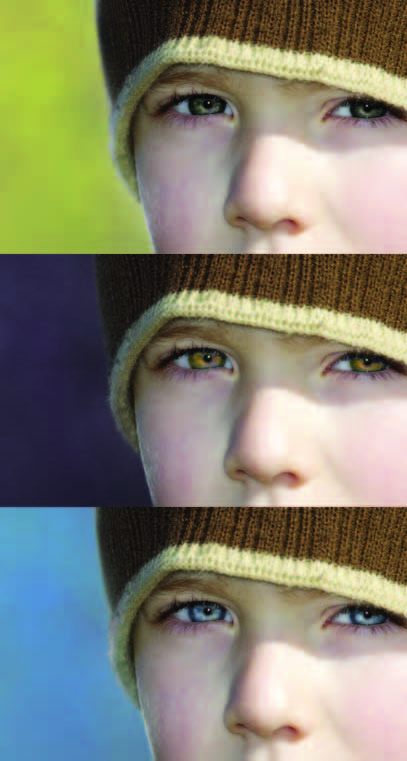
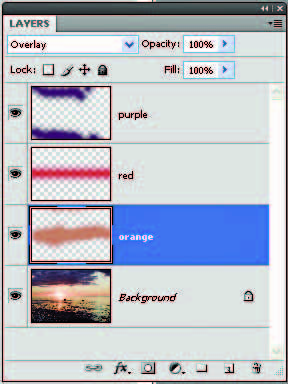 The way to add colour to your image is to make a new empty layer (Shift-Ctrl/Cmd N) change the layer to “colour mode” (Overlay, Multiply and Screen work well also!) and paint your selected colour on that new layer with a brush tool . The magic will appear right before your eyes, and you can put different colours on different layers. It is a good idea to take notes as you experiment so you can keep track of what you have created at each stage of the process. It is always a good idea to keep your work organized.
If you make a mistake, just use the eraser to remove colours. Change the layer mode back and forth, and use the normal view to see exactly where you applied the colours. The final step is to use the layer opacity slider to enhance or subdue the colour density to your taste.
Please don’t abuse theses techniques because this can ruin an image in the blink of an eye. Of course, with Halloween coming up very soon, you might want to make your model look like an alien!

Before

After
Now that you have mastered this Photoshop technique, don’t let the magic stop here. With these basic skills you can add or change colours in any image – add impact to a sunset, change the colours of clothes, fix skin colours – the Photoshop techniques that we have explored today are the basic tools that you can use everyday.
Using a new layer with colour mode transparency is a wonderful way to add colour to older black and white photos….
Let me suggest one more trick to end this magic show… if you want your white subjects to look really white, just use the saturation slider to desaturate the part you want white (with a good mask)…
Make sure to use and discover the saturation adjustment layer. It is a wonderful tool for any photographic retouching tasks, and it can be so much fun!
Article by Michel Roy
| PHOTONews on Facebook | PHOTONews on Twitter |


